The most effective corporate event photo ops complement broader event designs by giving attendees something hands-on to do. Interactive builds evolve as the event progresses, adding a layer of active participation to static backdrops and scenic environments.
Practical factors, such as available space, staffing requirements, capacity, booking lead times, and post-event cleanup, eliminate far more options than personal taste ever will. Here is how these 11 formats compare across those key criteria.
Event Photo Opportunities at a Glance
Photo op formats generally fall into complementary categories: traditional backdrops and booths give guests a dedicated moment to pose; message boards and paint walls invite them to leave a note or mark; and live mosaics invite them to help construct the installation itself. Combining these elements allows event producers to create a rich, multi-layered experience.
| Format | Engagement style | Best fit for | Life cycle |
|---|---|---|---|
| Step-and-repeat | Passive (posing only) | Quick arrival portraits, tight budgets, or secondary photo spots | Stored as a rolled banner or recycled |
| Prop table | Light interactive (playful posing) | Adding variety to an existing backdrop or themed photo area | Props returned to storage bins |
| Themed built environment | Immersive passive (stepping into a set) | High-budget flagship events where visual impact is paramount | Dismantled and returned to rental inventory |
| Photo booth | Serial interactive (one group at a time) | Smaller gatherings or casual events needing traditional souvenirs | Packed up by vendor; guests keep printed strips |
| 360 booth | High-energy social sharing | Evening galas or brand parties focusing on short-form video content | Packed up; video clips sent digitally to guests |
| Instant-print board | Collaborative sharing (photo + message) | Milestone celebrations, retirements, or intimate corporate retreats | Completed board is kept and displayed at the office |
| Message wall | High-throughput group interaction | Large all-hands or conferences wanting wide attendee expression | Photographed digitally, then removed/recycled |
| Paint wall | Hands-on artistic collaboration | Creative team gatherings or multi-day retreats | Finished painting retained for permanent office display |
| Digital photo mosaic | Hybrid digital/physical contribution | Large multi-day events aiming for real-time visual evolution | Digital graphic provided; physical mosaic kept if printed on site |
| Live-build brick mosaic | Tactile, team-building collaboration | Company all-hands or conferences boosting parallel participation | Rented; returned to the studio unless bought to keep |
| Commissioned centerpiece | Passive observation (focal point) | Major corporate anniversaries or brand unveilings seeking lasting impact | Permanently owned and installed in company headquarters or lobby |
Posing, marking, and building represent the three primary ways attendees interact with a photo op. Commissioned centerpieces differ by offering a pre-assembled display that guests view and photograph.
Industry research highlights a growing demand for interactive experiences. In Freeman’s Unpacking XLNC report with IMEX, 61% of attendees defined immersive experiences as hands-on engagement. Similarly, Amex GBT’s forecast notes that interactive sessions saw the largest rise in attendee expectation over five years (42%). As Emma Bason, Director of Global Venue Sourcing at Amex GBT, explains: “Attendees want to walk away feeling like they’ve done something that wasn’t just for work — that they’ve come away with the story of being here.”
1. The Branded Step-and-Repeat
A printed step-and-repeat backdrop is the most affordable photo op and one that many companies already own. PrintPlace, a major custom printing provider, outlines four standard banner sizes. They note that an 8′ × 8′ backdrop fits 4-5 people in frame and requires roughly 12′ × 10′ of floor space for proper positioning and photography.
Step-and-repeats require no dedicated staff or special scheduling, and print turnaround times are typically measured in just a few days.
Standard backdrops provide a clean, reliable focal point for photo ops. Because the background remains constant, adding complementary interactive activations alongside a step-and-repeat can help maintain high engagement throughout longer events.
Once the event concludes, all that remains is a rolled-up vinyl banner featuring a past date.
2. A Prop and Costume Table Beside the Backdrop
Adding a prop table next to an existing backdrop is a simple, low-cost upgrade. A box of themed hats, signs, oversized frames, or branded items requires only a single six-foot table.
Props give attendees fun options that vary the photos slightly, but they don’t offer an ongoing activity. Without dedicated staff to reset the table throughout the night, props quickly end up scattered in a messy pile.
Planning lead time is just a few weeks, and after teardown, the props simply go back into storage bins.
3. The Themed Built Environment
A themed environment is a custom-built physical set that guests step inside for a photo, such as a retro lounge, a custom-branded room, or an illuminated tunnel. These displays are built and supplied by exhibit houses and scenic fabricators.
Classic Exhibits, a trade show rental provider, outlines its setup specs in its rental catalog. Options range from 10′ × 10′ inline displays to 20′ × 20′ island booths. They recommend reserving displays 12–16 weeks before the event. Rush orders on standard inline designs can turn around in 8–10 days with print-ready graphics, with installation and dismantling managed by distributor crews.
A 20′ × 20′ island covers 400 square feet, over three times the space needed for a basic backdrop. That additional footprint provides significantly higher capacity, allowing larger groups to take photos together at the same time without long wait times.
Themed environments set an impressive visual stage for guests. Incorporating hands-on activities within or alongside these builds allows producers to combine striking scenic visual design with active attendee participation.
4. The Attended Photo Booth With Instant Prints
Photo booths are often the first idea planners consider, though market trends show shifting preferences.
Meeting professionals are adjusting their investments accordingly. In Amex GBT’s 2026 Global Meetings & Events Forecast, only 15% of respondents indicated plans to use digital photo booths at 2026 events. That ranked lowest among nine surveyed event technologies, far behind live polling (31%) and QR codes (26%).
Logistically, photo booths are simple: they require an open or enclosed booth, a power outlet, an attendant, and a printer. However, serving only one group at a time creates severe throughput constraints when trying to accommodate large crowds.
Vendors often market custom-branded shells and print templates as “brand activation” booths, though the core operation remains identical to standard photo booths.
Guests take printed photo strips home, while the booth equipment is packed up and removed after the event.
5. The 360 Spin Booth
360 photo booths are a popular modern choice, but they have strict operating requirements per person served. OrcaVue, a manufacturer of 360 platforms, details key setup specifications:
- Roughly 10 ft × 10 ft of recommended footprint
- A platform between 34 and 46 inches across, holding three to five people depending on the model
- 120v/240v power, with the motor drawing 200 watts at peak
- One staffer for smaller private events, or two for large-scale activations
Because the experience operates sequentially (one group steps up, the camera arm rotates, the video renders, and the group steps down), long wait times naturally develop.
A long line at a 360 booth clearly highlights these throughput limitations, often preventing a large portion of event attendees from getting a turn.
After teardown, the main output consists of digital video files delivered to participants.
6. The Instant-Print Photo Board
An instant-camera station turns individual photos into a shared display. Guests take a photo, wait for it to print, add a written note, and attach it to a collective photo board. Unlike digital selfies that stay on individual phones, the print board creates a visible shared installation for the entire room.
This format builds engagement in two ways: the display fills up throughout the event, giving late arrivals a reason to visit, and the final creation belongs to the whole group rather than individual camera rolls.
Film supply is the main operational constraint. According to Fujifilm instax mini 12 specs, film takes roughly 90 seconds to develop, and cartridges contain 10 exposures each. A group of 200 people requires at least 20 film packs, along with someone dedicated to reloading cartridges.
The physical footprint requires only a display board and a small table. Staffing is simple: just one attendant to reload film and manage markers. Unlike rented booth setups, the completed photo board can be brought back and displayed in the office.
7. The Message or Milestone Wall
Message walls give every attendee a simple way to participate, whether signing a timeline, writing on a gratitude board, or placing a pin on a company milestone map. As a fully interactive wall, it offers the highest throughput of any format because many people can contribute simultaneously.
The setup only occupies wall space and needs no electrical power, dedicated attendants, or structured scheduling. Attendees participate at their own pace, preventing crowd bottlenecks.
Large format printing requires careful sizing. Signs.com notes that maximum seamless wall decal sizes reach 52 inches by 1,798 inches. Because standard printers limit one dimension to roughly four feet, wider installations ship as multi-panel pieces that align on site.
With fast printing turnarounds available for orders placed by evening, lead time depends primarily on design finalization and internal sign-offs.
There are two primary limitations: message walls work best for wide group photos rather than individual portraits, and because they are printed on paper or vinyl, high-resolution photos must be taken before teardown to preserve the content.
8. The Collaborative Paint Wall
A grid-based paint-by-numbers wall lets attendees complete individual sections to create a finished artwork. It offers an affordable cost per square foot and leaves a lasting physical painting for office display.
Drying time requires advance planning. According to Benjamin Moore specs for Regal Select interior paint, paint is dry to the touch in one hour and ready for recoating in 1–2 hours at 77°F and 50% humidity. Lower temperatures or higher humidity extend drying times, meaning sections painted near the end of the event will still be wet during teardown.
Always verify wet-paint rules with the venue beforehand. You’ll also need drop cloths, a staff member to manage brushes and cleanup, and a plan for safely transporting curing canvas panels after the event.
Production lead time falls between standard printing and full fabrication, as custom artwork must be created, gridded, and numbered prior to shipping.
9. The Digital Photo Mosaic Wall
Digital photo mosaics combine small attendee photos to form a larger master image. Guests take photos at a photo kiosk or upload them via QR code. Software automatically analyzes each photo’s tone and color, placing it into the correct position on a dynamic wall that updates in real time.
Picture Mosaics, an industry provider for over 25 years, offers a patented Live Print option where attendees print their tiles on site and physically place them onto the mosaic grid. This interactive step significantly increases engagement by encouraging guests to walk over and contribute directly.
Logistics require dedicated power, high-speed photo printers, QR signage, and event staff to assist guests at the wall. Photo capture determines overall speed, while wall assembly moves quickly.
The end result is a memorable artwork made entirely of individual attendee photos, providing far greater value than standard event signage.
10. The Live-Build Brick Mosaic
A live-build brick mosaic divides a large custom image into numbered building sections. Attendees follow simple building cards to assemble their assigned piece before mounting it onto a shared grid, creating an engaging collaborative activation throughout the event.
Brick Built Models sizes LIVE Brick Mosaics™ for events from 100 to 100,000 guests, and each setup needs about a 10 x 10 ft activation area as a working minimum. Once assembled, the completed artwork doubles as an interactive photo opportunity and step-and-repeat for group photos. It is a photo op people helped build, which gives them their own reason to share it.
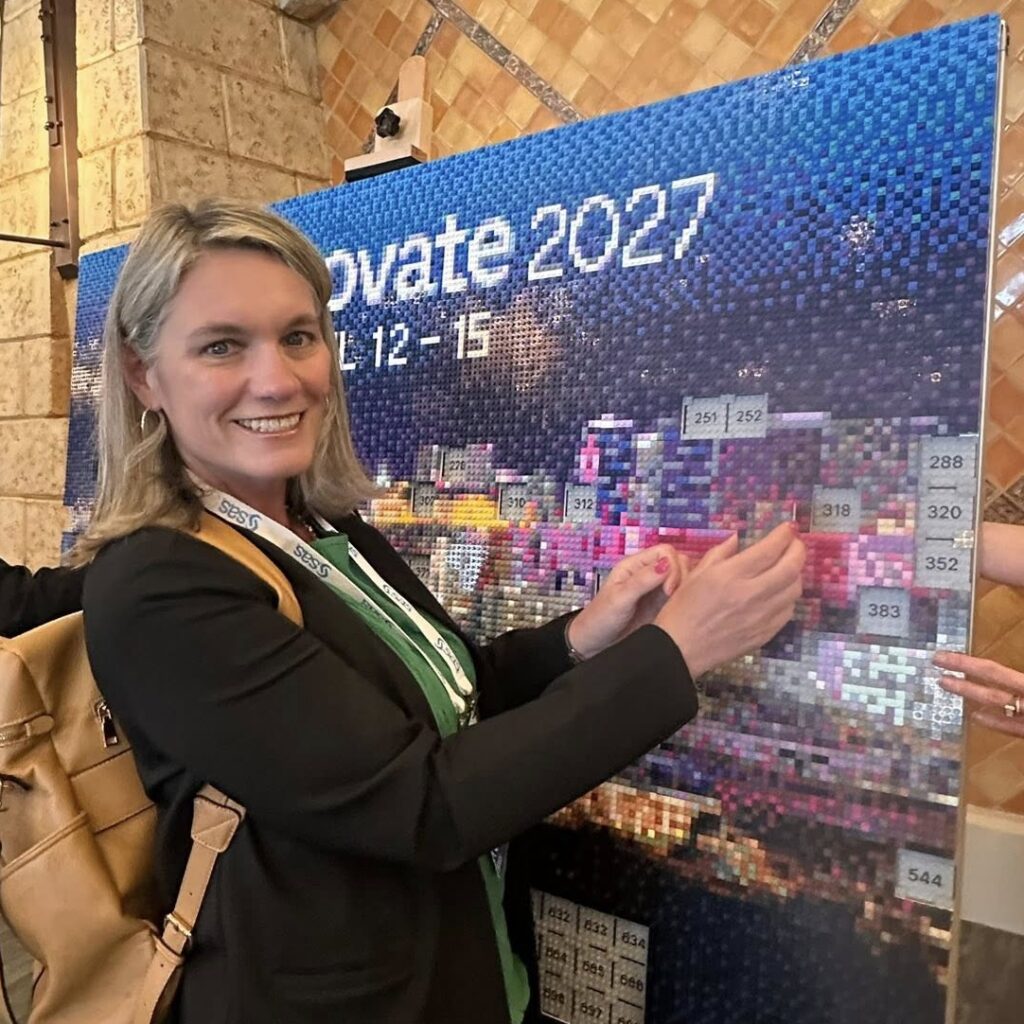
Mosaics can be rented for the duration of the event. Brick Built Models designs the build, brings it to your venue, runs it with our own team, so your people get to build and pose instead of staffing the station. If you want to keep the finished mosaic for the office, you can buy it instead, built to last, for about 35% more than the rental.
This format offers throughput unmatched by traditional photo ops. For example, during a 90-minute build at Victory of the Lamb, attendees completed a 75″ × 45″ canvas (135 sections) in just 90 minutes. With many guests building at once at shared tables, nobody had to wait.
Brick Built Models’ on-site team handles the build from start to finish, including:
- Bricks pre-sorted into labeled color bins
- Individual instruction sheets for participants
- Setting up the build area and the mosaic grid
- Guiding guests, adapting the build on the floor, and keeping it on pace
Section counts and design complexity are set by expected attendance and event duration.
The format scales smoothly for large multi-day conferences. At SAS Innovate 2026, roughly 400 out of 2,000 attendees helped build a 5′ × 3.7′ mosaic featuring 768 sections and 27,000+ LEGO® bricks. The build was staged across five phases over several days, maintaining high engagement throughout the event.
Staging the build ensured the mosaic remained an active attraction rather than a one-time photo stop. The mosaic was a rental and went back to the studio after the event.
Two to three months is the right lead time for a custom activation, and about seven weeks is the realistic minimum. Teams planning spring 2027 events are booking now.
11. The Commissioned Centerpiece
A commissioned centerpiece is a custom, large-scale physical model (such as a product replica, company mascot, or architectural model) designed as a main focal point for event photos.
The best-known example of a buzz-worthy trade show centerpiece is the life-size car Brick Built Models built from LEGO® bricks for Tekmetric, which makes shop management software for auto repair companies.
Brick Built Models designed, built, and staffed the activation at the 2026 SEMA Show in Las Vegas.
It was one of the busiest booths at the show, with a steady draw the whole time. Attendees and other brands posted their own photos and videos of it without being asked, and Brick Built Models’ Instagram reshared several of them. That is earned media the client did not pay for, and it started the conversation every booth wants: strangers asking what the company does.
At a different budget level, Huber Advanced Materials selected this approach for its HUBERpalooza event, commissioning a custom LEGO® city display measuring 3’9″ × 3’9″. The project required 110 hours of design and assembly, incorporating 14,000 individual elements and 30 gallons of bulk bricks.
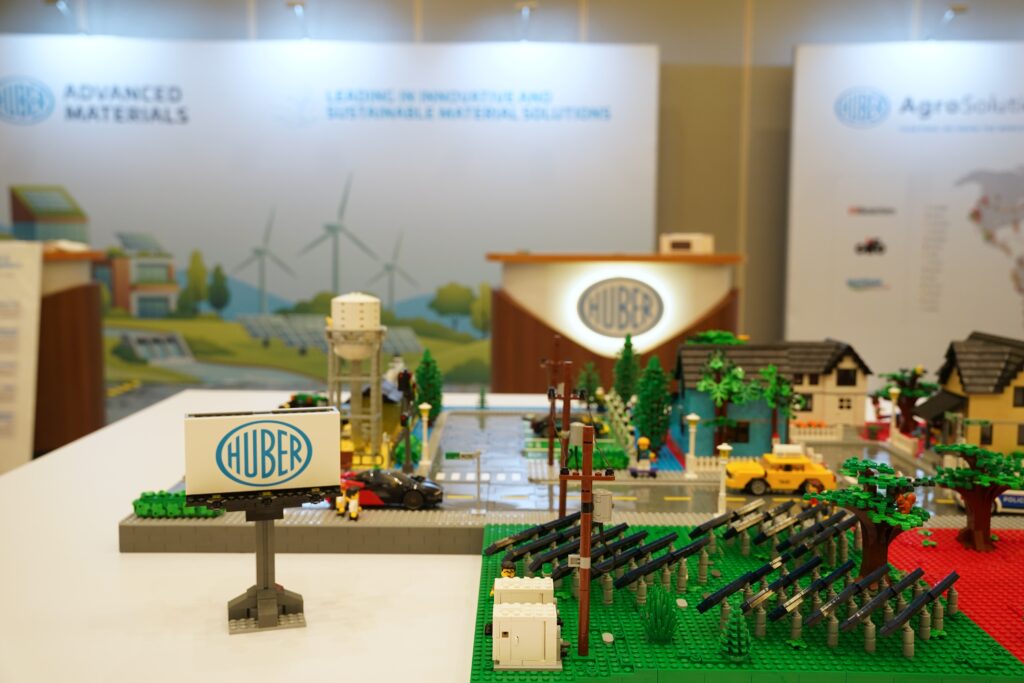
Because Huber chose to retain the piece permanently, the design utilized reinforced modular construction and custom wooden shipping crates.
Centerpieces require dedicated floor space and higher upfront investment. A piece built for an event is usually rented and run on site by Brick Built Models’ team; a piece bought to keep, like Huber’s, goes on to serve as a lobby display for years. Because they are finished before the event, they draw people in to look and take photos rather than to build.
Plan Against Floor Space, Staff Hours, and Throughput
Available floor space, staffing requirements, and hourly capacity ultimately dictate which photo op format best fits an event.
Floor Space Eliminates Options First
Review venue floor plans before narrowing options. In rooms crowded with buffet setups or staging, space-heavy formats like 360 booths may not fit. Confirming dimensions early prevents layout issues during setup.
Every Attended Format Is a Labor Line
Labor costs are a primary consideration in event budgeting. The Exhibitor Advocate’s 2025 Annual Survey of Exhibition Rates revealed that 55% of organizers are limiting on-site staffing, with 80% citing cost management as their top challenge. Event Marketer benchmark data puts general event labor at an average of $54.23/hour, meaning dedicated attendants quickly add up over a full event.
When balancing production expenses, look for photo ops that don’t require your own staff. Low-maintenance formats like message walls, or vendor-run activations where the vendor’s team handles the station. A live brick mosaic from Brick Built Models is the second kind, so your people stay free to talk with guests.
The key question for planners is simple: does your team have available staff to manage the photo op throughout the entire event?
Serial Formats Have a Ceiling You Can Calculate
Most photo booth vendors publish equipment dimensions and power requirements, but rarely publish throughput capacity. Calculating potential hourly capacity helps set realistic expectations for attendee participation.
Single-group formats have inherent capacity limits. Assuming a two-minute turnaround per group, a photo booth handles 30 groups per hour, or 120 groups during a 4-hour window. For an event with 800 attendees, a single booth cannot accommodate everyone.
By contrast, collaborative formats eliminate individual line bottlenecks by allowing multiple attendees to build or interact simultaneously at shared tables.
While photo booths excel at social gatherings where guests need icebreakers, corporate teams benefit more from collaborative activities that foster connection. This makes interactive team-building activations a great fit for company events.
Evaluate success based on attendee engagement: total participants, time spent at the activation, and overall interaction. For internal company events, active involvement matters most. At trade shows and brand events, it’s all about generating buzz, foot traffic, and earned media that reverberates across social channels.
Settle Rent-or-Own Before You Get a Quote
Most event photo ops are rented, and brick activations are no exception. Deciding early whether you also want to keep the finished piece affects both the price and how it is built.
Brick Built Models’ activations are rentals: its team brings the build, runs it during the event, and takes it back afterward. Buying the piece instead costs about 35% more and changes the build itself, with sturdier construction and packing, as seen in Huber’s custom centerpiece.
Because custom activations vary in scope, vendors typically provide custom quotes rather than fixed rate cards. Brick Built Models’ activations start at $10,000 and are priced roughly by the day, with each extra day costing less.
A standard backdrop is usually bought outright, while a rental activation covers design, production, round-trip freight, and the on-site team.
Settling this upfront prevents budget surprises later.
Ask vendors three key questions during initial discussions:
- Is this activation a rental, or do we retain the finished display?
- What are the costs to keep the display, and when must that decision be finalized?
- How does ownership impact production timelines and shipping logistics?
Send the Date, the Headcount, and the Venue
Choose photo ops based on clear operational goals rather than just aesthetics. Factor in space requirements, staffing capacity, hourly throughput, lead times, and post-event display plans.
Brick Built Models creates custom LIVE Brick Mosaics™ for corporate events, employee appreciation days, and company all-hands. Our team runs each one on site, so your people can build, pose, and talk with each other instead of staffing the station.
To explore options for your next event, prepare three basic details: your event date, expected headcount, and venue location.
Contact us today to request a quote or schedule a consultation call.
Frequently Asked Questions About Corporate Event Photo Ops
What Makes a Good Photo Op for a Corporate Event?
A great corporate photo op engages attendees with an active experience rather than a passive backdrop. Dynamic builds evolve throughout the event, offering late arrivals a fresh experience and producing a lasting keepsake for office display. Success is measured by overall attendee participation and engagement.
How Much Floor Space Does an Event Photo Op Need?
Space requirements vary by format. Message walls use existing wall space with zero floor depth. PrintPlace recommends roughly 12′ × 10′ for an 8′ × 8′ step-and-repeat banner, while OrcaVue suggests 10′ × 10′ for a 360 spin booth. Built environments from Classic Exhibits range from 10′ × 10′ to 20′ × 20′ and larger. A live-build brick mosaic needs about a 10 × 10 ft activation area as a working minimum, which covers the mosaic grid and the build tables.
Do You Rent or Buy a Live Mosaic Photo Op?
You rent it. Brick Built Models designs the LIVE Brick Mosaic™, brings it to your event, runs it with its own team, and takes it back to the studio afterward. If you want to keep the finished mosaic for framing, wall mounting, or future events, you can buy it instead, built to last, for about 35% more than the rental.
How Far in Advance Should You Book an Event Photo Op?
Lead times range from a few days for standard printed banners to several weeks for custom photo booth setups. For a custom brick activation, plan two to three months ahead; about seven weeks is the realistic minimum.
How Many People Can Take Part in a Live-Build Brick Mosaic?
Brick Built Models designs mosaics for crowds ranging from 100 to 100,000+ guests, adjusting section counts to fit event schedules. At Victory of the Lamb, participants built 135 sections in 90 minutes. At SAS Innovate 2026, 400 attendees assembled 768 sections over several days. Because multiple guests build at the same time, throughput scales naturally with table space.
What’s a Good Alternative to a Photo Booth for a Company Event?
Interactive building experiences serve as excellent alternatives to traditional photo booths. According to Amex GBT’s 2026 Global Meetings & Events Forecast, only 15% of event planners expect to rely on digital photo booths in 2026. Live-build brick mosaics, digital photo walls, and paint walls offer engaging group activities while delivering unique photos and permanent physical keepsakes.
LEGO® is a trademark of the LEGO Group, which does not sponsor, authorize, or endorse Brick Built Models.